How to Capture a Smokey Waterfall Shot
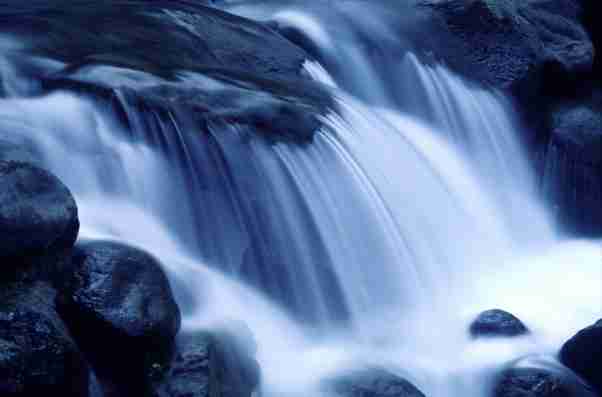
This silky water shot is easier to capture than it might look however, creating a strong landscape images one needs to be patient. Foreground interest and composition will also play a major part in recreating this shot. So grab your tripod and get walking.
How to Capture a Smokey Waterfall Shot
1 x DSLR Camera
1 x Standard LensandTelephoto Lensand (50mm and above focal length)
1 x Lens Hood to fit lens (Used to reduce flare when shooting outdoors particularly when skin tones are of importance)
1 x Tripod Preferably with a pan tilt head for accuracy. Also one that is sturdy enough to support your equipment.
1 x Circular Polarizing Filter
1 x Remote Cable , this will prevent camera shake during long exposures.
Method:
1. Combine camera, lens and attach the lens hood.
2. Before placing the camera on the tripod, go for a walk around the waterfall. Make sure you look through the viewfinder regularly to find the best perspective.
3. Once you have found your spot place the camera on the tripod, be sure camera is locked in and the tripod legs are on sturdy ground.
4. Now compose the image and frame the shot, try incorporate some foreground interest (such as rocks, a tree etc) and utilise the rule of thirds. Framing the shot with the surrounding environment can also be effective although, this shot is zoomed in quite tight.
5. Once you have your composition set, attach the polarising filter. This will eliminate any reflections and also give you the added benefit (for this shot) of an extra stop. Meaning you can slow down the water even more. Turn the Circular polariser until you acquire the right amount of polarisation for the shot. You will be able to see this change through the viewfinder, similar to putting on polarised sunglasses.
6. When setting the exposure please note the ISO. You will need this at the lowest i.e. 100 this will improve the image quality. A setting of 100 is low, meaning the sensor will have a low sensitivity to light also allowing for lengthy shutter speeds.
7. Test and balance the exposure to match that of a 5 second or below shutter speed.
You can shoot this in Shutter priority mode so that you can control the shutter, instead of the camera controlling the speeds.
You will need to set the camera onto 5 sec or slower by using the shutter priority mode” Tv on Canon and S for Nikon. This will then let the camera decide the corresponding aperture size for you, that's right you do not need to set the aperture, the camera will adjust that for you. When you look through the viewfinder you will see a setting at the bottom that looks like this:
F-- showing you the aperture
5 Showing the shutter speed. (This is a 5 second exposure)
8. Fire off a few test shots making sure the settings and composition are working for you and when you think you have it set the camera to manual focus and attach the shutter release.
Focus the shot and fire the shutter using the remote, this will eliminate camera shake from manually pressing the shutter button.
9. Take your time in completing the shot making sure to experiment with different length exposures. Be meticulous when focusing and composing the shot and most of all be patient, it may take a few goes to get the image you are happy with.
Note: experiment with your white balance a tungsten white balance will produce a blue tone as seen in this particular image.
The digital age is great, it means we don't have to worry about wasting film anymore. However don't just go crazy, pressing the shutter is an art. Have a look at what you shot, make changes if necessary and then go again. Having a routine like this will help your improve you image success rate.
9. Shoot like no one is watching™
How To Take a Better Photo Menu
If you liked this How to Take a Better Photo then you might love our other How to Take a Better Photos Hints & Tips Cameras Direct Australia. Helping you take a better photo. For Free#PhotographHowTo #PhotographWaterfall #HowToUseNDFilter


