How to Create Baby Memories
Proud partners ... what can I say. Take so many pictures of your new baby and show your relatives until they can't take it any longer! Make your new baby's photos so good that everyone wants to see more and have you tell them how you did it. This Baby Photo Master Class is simple and with the easy to follows hints & tips you will soon be amazing yourself with your great Baby Photos. Enjoy.
Take Better Baby Pictures
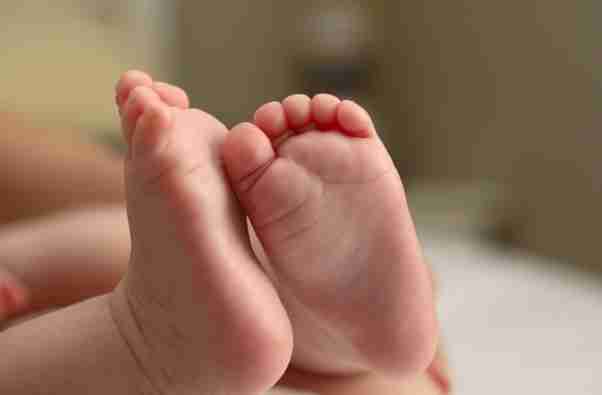
If you are expecting or have just received a new addition to the family then you might be itching to start filling up their baby album with memories. Everyone can take candid shots of their children which are great for reminiscing or the odd nudie photo which gets pulled out at their 21st. Achieving the emotive style of photography you want to hang or frame can be a little more difficult to create. Feet and hands make a great subject matter as they speak volumes of the size of the baby and in time give you a nice point of reference.
How to Create Baby Memories
1 x DSLR Camera
1 x Standard Lens with a wide aperture (50mmand F1.8 or wider) The wider aperture will allow you to create that soft out of focus feel.
1 x A Clean baby
Method:
1. Open all the curtains in the house and have a walk through. Take note of rooms which are producing a nice soft white light keeping in mind this will vary throughout the day. The softer the light the less contrasty your shot will be, creating a more beautiful photo.
2. Once you have decided on a room this shot can be achieved in a variety of ways. First though attach your lens to your camera and we will get the exposure set up.
3. Set your camera to Aperture priority (AV on Canon, A on Nikon) and use F2. The lower the number of your aperture the more light enters the camera allowing for brighter shots indoors, the lower number also produces a faster drop off in focus meaning your subject becomes more separated from the background. You may notice at this time that your lens does not allow you to select that aperture. This is the time to look at the 50mm f1.8 lens. Most manufacturers have them and they are reasonably priced and they will help you no end with these types of photos.
4. Before you bring in the baby try a few test shots by placing a cushion (preferably a mid tone colour grey or light brown) on the bed, couch or change table wherever you are thinking of taking the photo. If the images are coming out too dark or blurry you may need to change your ISO, try to stay around ISO 400 as some cameras will begin to produce noise if pushed any higher. Note: Keep the background uncluttered.
5. When you are happy with the lighting and your exposure it's time to bring in the baby. If you have a helper to hold the baby this will make your task a little easier, if not never mind just make sure the baby is in a safe position, you can even prop their legs up with a pillow. If you are lucky enough to have a helper you can just get them to hold the baby in position. Make sure you pay extra attention to the light here, you want the light hitting the feet on the side not too front on or the overall photo can appear flat.
6. Keep the crop nice and tight, too far away and you will lose the concept, too close and people may not recognise what it is you have shot.
7. Take a few shots and experiment with your focus points, focus on the front foot then on the back one. Visualise the final shot before pressing the shutter and try to hold back from taking the shot if you think it could be better, rearrange your composition or subject and try again.
Note: If done well these shots can look great printed quite large on canvas.
How To Take a Better Photo Menu
If you liked this How to Take a Better Photo then you might love our other How to Take a Better Photos Hints & Tips How To Take a Better Photo Menu Cameras Direct Australia. Helping you take a better photo. For Free#Photography #PhotographyHowTo #HowToPhotoBaby #BabyPhotography


